Practical Guides
Comprehensive resources for conservation and repair of historic buildings
Practical Knowledge for Heritage Conservation
Our practical guides provide detailed technical information for professionals working with Ireland's historic buildings. Each guide draws on centuries of traditional building knowledge combined with contemporary conservation science, offering best-practice approaches to maintaining and sensitively adapting heritage structures.
Developed specifically for the Irish context, these guides address the unique challenges presented by local building traditions, climate conditions, and regulatory requirements while adhering to international conservation standards.
Masonry & Stone Conservation
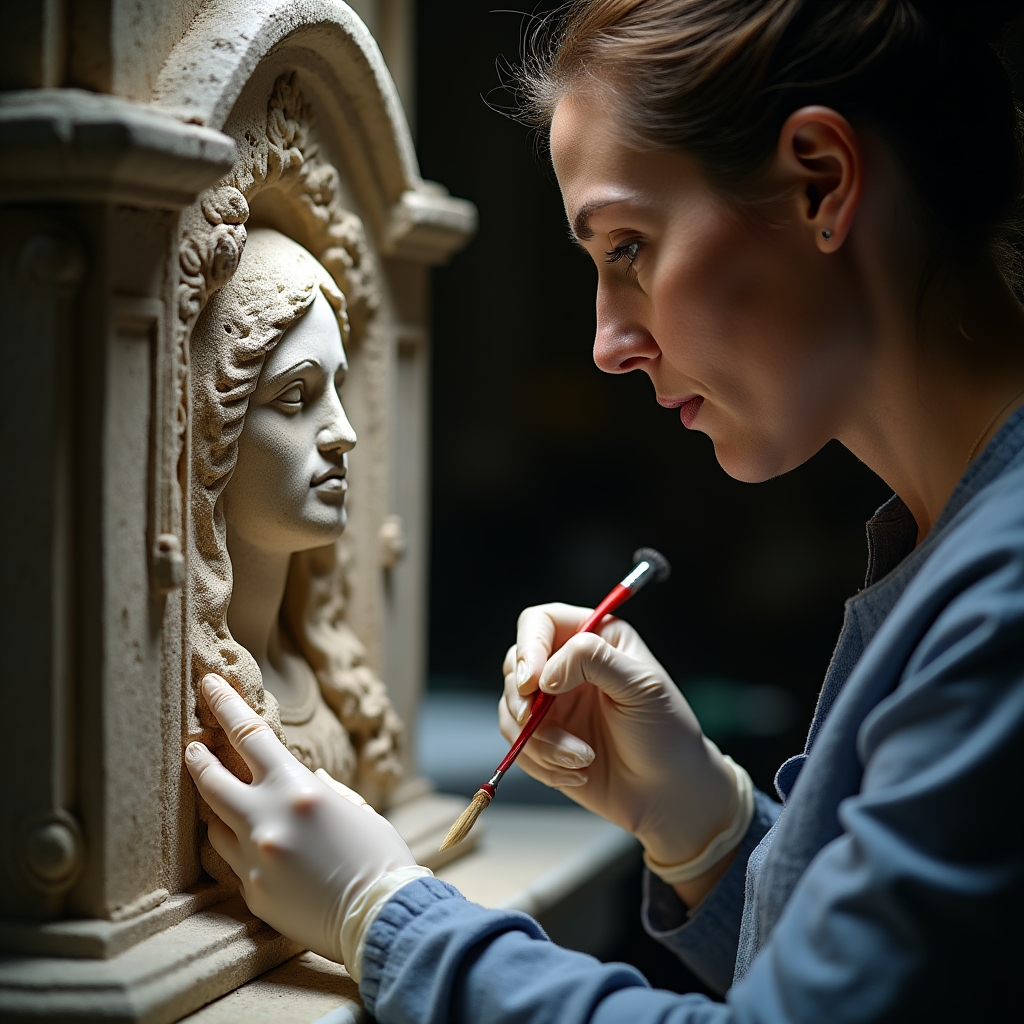
Ireland's built heritage is characterized by a diverse range of stone types and masonry construction techniques. From medieval limestone churches to Georgian granite townhouses and vernacular rubble structures, each presents unique conservation challenges. This guide provides methodologies for assessment, repair, and conservation of historic masonry structures.
Stone Identification & Assessment
Objectives:
Accurate identification of stone types and deterioration mechanisms to inform appropriate intervention strategies.
Key Tools & Materials:
- Hand lens (10x magnification)
- Digital moisture meter
- pH testing kit
- Irish Stone Atlas reference materials
- Digital camera with macro lens capability
Methodology:
- Document the masonry pattern, bond type, and joint characteristics
- Identify primary stone types through visual assessment and comparison with reference samples
- Record surface conditions, noting weathering patterns and decay mechanisms
- Measure moisture content at various locations and heights
- Test for salt presence using conductivity or ion strip tests
- Map findings on elevation drawings or photographic records
- Determine if laboratory analysis (thin-section petrography, XRD) is required
Important Considerations:
Different stone types often behave differently within the same structure. Irish limestone, sandstone, and granite each display characteristic decay patterns influenced by local climate conditions. Assessment should identify both the immediate conditions and underlying causes of deterioration.
Mortar Joint Repair & Repointing
Objectives:
Removal of deteriorated or inappropriate mortar and replacement with compatible materials that protect the structure while matching historic appearance.
Key Tools & Materials:
- Hand tools for mortar removal (chisels, quirks)
- Natural hydraulic lime (NHL 2.0 - 5.0 depending on exposure)
- Well-graded aggregates matching the original mortar
- Natural pigments (if required)
- Pointing irons and trowels
- Spray bottle for mist curing
Methodology:
- Analyze existing mortar to determine composition, color, texture, and aggregate profile
- Carefully remove deteriorated mortar to a depth of 2-3 times joint width (minimum 25mm)
- Clean joints thoroughly, removing all dust and debris
- Pre-wet masonry adequately (but not saturated)
- Prepare lime mortar using appropriate NHL grade for the exposure conditions
- Apply mortar in layers for deep joints, allowing each to reach thumbprint hardness
- Tool joints to match historic profile and texture
- Protect work from sun, wind, and rain; maintain appropriate humidity for curing
- Implement slow mist curing regime for at least 7 days
Important Considerations:
Repointing should be limited to areas where mortar has failed. Wholesale repointing of structures is rarely necessary and can damage historic masonry. Cement-based mortars are almost always inappropriate for traditional masonry and should be replaced with lime-based alternatives. Work should be scheduled during frost-free periods.
Stone Consolidation & Repair
Objectives:
Stabilization of deteriorating stone surfaces and repair of damaged elements while preserving maximum historic fabric.
Key Tools & Materials:
- Stone consolidants (silicic acid esters/ethyl silicates)
- Lime-based repair mortars
- Matching stone for dutchman repairs
- Stone carving tools
- Syringes and brushes for application
- Temporary formwork for repairs
Methodology for Consolidation:
- Ensure stone is clean, dry, and free of surface treatments
- Test consolidant on inconspicuous area to assess compatibility and color change
- Apply consolidant according to manufacturer's instructions (typically by low-pressure spray, brush, or pipette)
- Work from bottom to top on vertical surfaces
- Protect treated areas from water for recommended curing period (typically 2-3 weeks)
Methodology for Mortar Repairs:
- Remove loose material and prepare a stable substrate
- Create a matching repair mix with NHL, stone dust, and aggregates
- Build up deep repairs in layers (maximum 10mm per layer)
- Match original surface texture through appropriate finishing techniques
- Protect repairs during curing with damp hessian if necessary
Important Considerations:
Stone consolidation should be considered a last resort when stone is actively friable. Inappropriate consolidation can accelerate decay by trapping moisture within stone. Dutchman repairs (partial stone replacement) are preferable to wholesale replacement when structural integrity permits. All repairs should be visually compatible but distinguishable upon close inspection.
Structural Repairs for Masonry Walls
Objectives:
Address structural issues in masonry walls while minimizing disruption to historic fabric and ensuring long-term stability.
Key Tools & Materials:
- Stainless steel or non-ferrous ties and reinforcement
- Hydraulic lime grouts (NHL 3.5 or 5)
- Lime-based crack repair mortars
- Grouting equipment
- Temporary support systems
Methodology for Crack Repair:
- Determine cause of cracking before attempting repair
- Monitor cracks using tell-tales to establish if movement is ongoing
- Remove loose material and clean crack thoroughly
- For hairline cracks, inject lime grout using syringe or gravity feed
- For wider cracks, pack with compatible lime mortar in layers
- For structural cracks, consider stitching with stainless steel ties
Methodology for Wall Core Consolidation:
- Identify areas of loose core using hammer testing or thermal imaging
- Create injection points at 500mm centers in mortar joints
- Flush voids with water to remove debris and pre-wet surfaces
- Prepare lime grout with appropriate flow characteristics
- Inject grout from bottom to top at low pressure
- Monitor for grout leakage and seal as necessary
- Maintain records of grout volumes used as indication of void extent
Important Considerations:
Structural interventions must address the cause of failure, not just symptoms. Common causes in Irish buildings include foundation movement, roof spread, and prior inappropriate interventions. A structural engineer with conservation experience should be consulted for significant issues. Cement-based materials should be avoided in favor of compatible lime-based alternatives.
Regulatory Context for Masonry Works
In Ireland, any work on a Protected Structure or within an Architectural Conservation Area that would materially affect its character requires planning permission under the Planning and Development Act 2000 (as amended). This includes most masonry repair and repointing works beyond routine maintenance.
Conservation professionals should refer to:
- Architectural Heritage Protection Guidelines (Department of Housing, Local Government and Heritage)
- BS 7913: Guide to the Conservation of Historic Buildings
- Historic Environment Scotland Technical Papers (particularly for masonry conservation)
- Local authority conservation officer guidance
Grant funding may be available through the Built Heritage Investment Scheme or Historic Structures Fund for qualifying works.
Timber & Carpentry
Timber has been a fundamental building material throughout Ireland's architectural history, from medieval roof structures to Georgian floor joists and decorative elements. This guide covers the assessment, conservation, and repair of historic timber elements, focusing on traditional carpentry techniques and appropriate interventions that respect original craftsmanship and material characteristics.
Timber Condition Assessment
Objectives:
Evaluate the structural integrity and condition of historic timber elements, identifying species, decay mechanisms, and appropriate repair strategies.
Key Tools & Materials:
- Moisture meter (resistance type)
- Awl or thin-blade knife
- Inspection borescope
- Timber species identification guide
- Mallet for acoustic testing
Methodology:
- Visually inspect all accessible timber surfaces, noting any visible deterioration
- Use moisture meter to map moisture content (readings above 20% indicate decay risk)
- Test timber firmness using awl probing at vulnerable locations (bearing ends, joints, below leaks)
- Use acoustic testing to identify hollow areas indicating internal decay
- Where appropriate, use borescope through small drill holes to inspect concealed areas
- Identify timber species through visual characteristics or small sample analysis
- Map findings on drawings, distinguishing between structural and cosmetic issues
Important Considerations:
Historic Irish buildings typically used oak, pine, and elm for structural elements, with species selection influencing durability and repair approaches. Common issues include fungal decay at wall interfaces, beetle infestation (particularly deathwatch beetle in oak), and prior inappropriate repairs. Assessment should always identify the moisture source driving deterioration rather than just treating symptoms.
Structural Timber Repairs
Objectives:
Repair deteriorated structural timber elements while preserving maximum historic fabric and ensuring structural integrity.
Key Tools & Materials:
- Seasoned timber matching the original species
- Traditional hand tools (chisels, saws, planes)
- Traditional carpenter's bench
- Stainless steel or oak pegs for connections
- Temporary support framework
Methodology for Splice Repairs:
- Install temporary supports to stabilize the structure
- Cut away deteriorated timber to sound wood (minimum 100mm beyond decay)
- Shape matching timber section with appropriate scarf joint (typically halved or bridled)
- For beam ends, use a horizontal scarf joint with haunch or beveled end
- For truss members, select appropriate jointing to transfer loads correctly
- Secure connection with oak pegs, stainless steel bolts, or traditional joinery techniques
- Ensure repair timber has similar grain orientation and moisture content to original
Methodology for Resin Repairs:
- Consider resin repairs only when splice repairs would require excessive timber removal
- Remove all decayed timber to sound wood
- Insert stainless steel or glass fiber reinforcement rods into pre-drilled holes
- Create formwork to contain resin during curing
- Mix epoxy or polyester resin according to manufacturer's instructions
- Pour or inject resin to create new bearing end or reinforcement
Important Considerations:
Traditional timber repairs should be favored over synthetic alternatives where feasible. Repairs should be honest and not disguise the intervention entirely. New timber should be well-seasoned (ideally below 15% moisture content) and from sustainable sources. Resin repairs should be limited to situations where loss of original fabric would otherwise be excessive.
Window Conservation & Repair
Objectives:
Preserve historic window joinery while improving thermal performance and functionality through appropriate conservation techniques.
Key Tools & Materials:
- Steam stripper for paint removal
- Timber repair epoxy for localized decay
- Matching timber for spliced repairs
- Linseed putty
- Linseed oil paint
- Draught-proofing materials
Methodology for Sash Window Repair:
- Document window details and condition before removal
- Carefully remove sashes, labeling components for reinstallation
- Remove failed putty and deteriorated paint using steam or hot air methods (avoid chemical strippers)
- Repair decayed timber through splicing or epoxy consolidation
- Replace broken cords and repair or replace pulleys
- Clean and lubricate hardware, replacing only if beyond repair
- Install discreet draught-proofing systems
- Re-glaze with appropriate glass, bedding in linseed putty
- Prime and paint with traditional linseed oil paint
Methodology for Thermal Upgrading:
- Consider options based on window significance and condition:
- Draught-proofing (compression or brush seals)
- Secondary glazing (particularly for Georgian/Victorian windows)
- Slim double glazing (for less significant windows where replacement is necessary)
- Internal shutters (restoration or installation where evidence exists)
- Heavy curtains with pelmets
Important Considerations:
Historic windows are integral to a building's character and should be retained whenever possible. Irish Georgian and Victorian windows often feature crown or cylinder glass that creates distinctive optical qualities worth preserving. Wholesale replacement is rarely necessary or appropriate. Conservation approaches can achieve significant thermal improvements while preserving historic fabric.
Historic Timber Floor Conservation
Objectives:
Preserve historic flooring while addressing structural issues, upgrading thermal/acoustic performance, and maintaining authenticity.
Key Tools & Materials:
- Reclaimed flooring boards matching original
- Traditional cut nails
- Insulation materials compatible with traditional structures
- Floor board lifter
- Waxes and traditional finishes
Methodology for Floor Board Repair:
- Document floor pattern before disturbance
- Carefully lift boards using proper tools to minimize damage
- Label boards for reinstatement in original locations
- Inspect and repair joists as needed
- Replace severely damaged boards with matching reclaimed timber
- For localized repairs, splice in new sections with scarfed joints at joist positions
- Reuse original fixings where possible, or replace with matching cut nails
- Apply appropriate finish (traditional wax, oil, or shellac depending on period)
Methodology for Insulation Upgrade:
- Lift boards carefully to access joist space
- Clean joist space and treat any encountered decay
- Install breathable insulation between joists (woodfiber, sheepswool, or hemp products)
- Ensure ventilation paths remain at joist ends to prevent moisture accumulation
- Install airtight layer if appropriate (consider moisture risk carefully)
- Reinstate boards in original positions
Important Considerations:
Wide pine and oak boards common in Irish historic buildings are valuable artifacts that should be preserved. Squeaks and minor unevenness are characteristic of historic floors and not necessarily defects requiring remedy. When adding insulation, moisture risk assessment is critical to avoid condensation within floor voids. Maintaining subfloor ventilation is essential for long-term timber health.
Regulatory Context for Timber Works
Historic windows, doors, floors, and structural timber elements in Protected Structures are covered by statutory protection. Replacement rather than repair typically requires planning permission. Conservation professionals should consult:
- Architectural Heritage Protection Guidelines (Department of Housing, Local Government and Heritage)
- Energy Efficiency in Traditional Buildings (SEAI guidance)
- Building Regulations Technical Guidance Document L - Conservation of Fuel and Energy (historic building exemptions)
For structural timber interventions, Building Regulation compliance may be required, with potential alternative approaches available for historic structures under Technical Guidance Document A (Structure).
Lime Mortars & Renders
Lime-based materials have been fundamental to Irish building traditions for centuries, providing protective coatings and structural bonds that allow historic buildings to manage moisture effectively. This guide covers the preparation, application, and curing of lime mortars, renders, and plasters appropriate for Irish historic buildings, focusing on techniques that ensure durability in Ireland's damp maritime climate.
Understanding Lime Types & Selection
Objectives:
Select the appropriate lime type for specific applications based on historic context, exposure conditions, and required performance.
Lime Types Comparison:
| Lime Type | Properties | Suitable Applications |
|---|---|---|
| Non-hydraulic (CL90) | Pure calcium lime, sets by carbonation only, slow setting, highly breathable | Interior plasters, sheltered pointing, limewash, putty for fine finishes |
| Feebly Hydraulic (NHL 2) | Sets by both carbonation and hydraulic reaction, moderate strength | Internal and moderately exposed external renders, general pointing |
| Moderately Hydraulic (NHL 3.5) | Stronger initial set, good balance of strength and flexibility | External renders, most pointing applications, bedding masonry |
| Eminently Hydraulic (NHL 5) | Strongest and quickest setting, less breathable | Exposed areas, below ground, structural applications, chimneys |
| Hot-mixed Lime | Quicklime mixed with sand and water, traditional method | Authentic repairs to pre-19th century structures, particularly mass masonry |
Selection Considerations:
- Historical accuracy: Match the original lime type where possible
- Exposure conditions: More exposed locations require more hydraulic limes
- Building element: Different applications require different strengths
- Irish climate: Our damp conditions often necessitate moderately hydraulic limes for external work
- Masonry type: Soft, permeable stone requires softer lime mixes than dense stone
Important Considerations:
Always analyze existing historic mortars before specification. Traditional Irish mortars often included local additions (seashell, brick dust, ash) that modified performance. For significant projects, consider mortar analysis to identify original constituents and match them appropriately. Avoid over-specifying stronger hydraulic limes when softer options would be more compatible.
Lime Mortar Preparation & Mixing
Objectives:
Produce consistent, workable lime mortars with appropriate characteristics for specific applications.
Key Tools & Materials:
- Natural Hydraulic Lime (NHL) of appropriate grade
- Well-graded, washed sharp sand
- Clean water
- Additives if historically appropriate (brick dust, hair, etc.)
- Drum mixer or mixing trough
- Measuring containers for consistent proportions
Methodology for NHL Mortars:
- Select appropriate mix ratio based on application (typically 1:2.5 or 1:3 lime:sand)
- Measure ingredients by volume using consistent containers
- For machine mixing:
- Add 3/4 of required water to mixer
- Add measured sand
- Add NHL powder
- Mix for 10 minutes, adding remaining water until desired consistency
- For hand mixing:
- Mix dry ingredients thoroughly
- Create a crater in center
- Add water gradually while mixing from edges inward
- Continue mixing until fully combined and workable
- Test consistency - mortar should hold shape when squeezed but not be overly wet
- For renders with hair, add after initial mixing and mix gently to distribute
Methodology for Hot-mixed Mortars:
- SAFETY CRITICAL: Appropriate PPE essential (eye protection, gloves, respirator)
- Mix dry sand with quicklime in ratio of approximately 3:1
- Add water carefully, causing exothermic reaction
- Cover and allow to cool before use, or use hot (traditional but requires experience)
Important Considerations:
Mortar should be used within 2-4 hours of mixing for NHL (varies by manufacturer). Protect stored materials from moisture and frost. In hot weather, keep mixed mortar covered with damp (not wet) cloths. Consistency should vary by application - pointing mortars should be stiffer than bedding mortars.
Lime Render Application
Objectives:
Apply protective and decorative lime renders that manage moisture effectively while respecting the historic character of the building.
Key Tools & Materials:
- Appropriate lime mix for base and finish coats
- Hawk and trowel
- Straight edge and timber float
- Spray equipment for mist curing
- Hessian sheets for protection
- Lath or mesh for areas requiring reinforcement
Methodology for Three-coat System:
- Prepare wall surface:
- Remove failed previous render
- Brush clean and dampen substrate (not saturated)
- Apply harling coat if necessary on very irregular surfaces
- Apply scratch coat (approx. 8-10mm):
- Use 1:2.5 NHL 3.5:sand mix with coarse aggregate
- Apply with firm pressure to ensure good bond
- Scratch surface horizontally when thumbprint hard
- Cure for at least 7 days before next coat
- Apply floating coat (approx. 8-10mm):
- Use 1:2.5 NHL 3.5:sand mix with medium aggregate
- Apply to dampened scratch coat
- Rule off to achieve even surface
- Float to compact and create key for finish coat
- Cure for at least 14 days before finish coat
- Apply finish coat (approx. 5-8mm):
- Use 1:2.5 NHL 2.0:sand mix with fine aggregate
- Apply to dampened floating coat
- Finish as appropriate (troweled, floated, or textured)
- Protect from direct sun, wind, and rain
Curing Regime:
- Cover with damp hessian for first 24-48 hours
- Mist spray 2-3 times daily for at least 7 days
- Protect from frost for at least 30 days
- Allow 4-6 weeks minimum before applying limewash or breathable paint
Important Considerations:
Traditional Irish renders were often finished with limewash, sometimes with local earth pigments added. Avoid rendering previously unrendered historic masonry without evidence of earlier renders. Respect regional differences in render application - western Ireland often featured more protective renders than eastern regions due to higher rainfall.
Limewash & Traditional Finishes
Objectives:
Apply breathable, traditional surface finishes that protect lime renders while providing appropriate aesthetic appearance.
Key Tools & Materials:
- Mature lime putty (for traditional limewash)
- Natural earth pigments if required
- Additives (linseed oil, tallow, casein) for specific applications
- Wide brushes (4-6" natural bristle)
- Clean water for dilution
- Spray equipment for dampening
Methodology for Basic Limewash:
- Prepare lime putty base:
- Dilute mature lime putty with water to consistency of milk
- Strain through fine mesh to remove lumps
- For pigmented wash, mix pigments with small amount of water first
- Add diluted pigment to base limewash (maximum 10% by volume)
- Prepare surface:
- Ensure render is fully cured (minimum 4 weeks)
- Remove dust and loose material
- Dampen surface with fine mist spray
- Apply limewash:
- Work in sections, maintaining wet edge
- Apply with crossing brush strokes (horizontal then vertical)
- Allow 24 hours between coats
- Apply 3-5 coats for good coverage
- First coat may be diluted further (5 parts water to 1 part putty)
Additives for Special Conditions:
- Linseed oil: Add 100ml per 10L for exposed locations (western facade)
- Casein: Add 1L skimmed milk per 10L for extra durability
- Tallow: Traditional Irish additive for exposed coastal sites (50g per 10L)
- Salt: 500g per 10L helps bind limewash in damp conditions
Important Considerations:
Traditional Irish limewash colors were influenced by local materials - off-whites, warm ochres, and soft earths were common. Avoid working in direct sunlight, strong winds, or when frost is expected. Limewash will appear transparent when wet and develop opacity as it dries. Expect some initial chalking which will reduce after weathering. The application is a sacrificial coating that will require periodic renewal (typically 5-7 years).
Regulatory Context for Lime Work
Changing the external finish of a Protected Structure requires planning permission. When specifying lime materials, consider:
- European Standards EN 459 (Building Lime)
- Irish Standard Recommendations for historic mortars
- Local authority conservation guidelines for render colors and finishes
- Built Heritage Investment Scheme criteria for grant-funded projects
The Irish Georgian Society and Building Limes Forum Ireland provide additional guidance on best practice for lime work in historic buildings.
Roofing Techniques
Irish historic roofs represent diverse traditions responding to local materials, climate conditions, and architectural styles. From slate and thatch to lead and copper, each roofing system requires specific conservation approaches. This guide covers assessment, repair, and replacement techniques for traditional roofing systems, with emphasis on maintaining weather protection while preserving historic character.
Irish Slate Roofing
Objectives:
Conserve historic slate roofing through appropriate repair and selective replacement, maintaining traditional detailing and appearance.
Key Irish Slate Types:
| Slate Type | Characteristics | Traditional Use |
|---|---|---|
| Killaloe (Clare) | Blue-black, varying thickness, irregular sizing | Western Ireland, diminishing course pattern |
| Valentia (Kerry) | Purple-green, thick, durable, often large format | Southwest Ireland, prestige buildings, heavy coverage |
| Westmoreland/Cumbrian | Blue-green, consistent thickness, regular sizing | Common on 18th/19th century urban buildings |
| Welsh (various) | Blue-purple-grey, thin, uniform | Victorian/Edwardian buildings, regular courses |
Key Tools & Materials:
- Reclaimed matching slates
- Copper nails or pegs
- Slate ripper
- Roofer's hammer
- Lead soakers and flashings
- Breathable roofing membrane (where appropriate)
Methodology for Individual Slate Replacement:
- Carefully remove broken slate using slate ripper
- Prepare replacement slate of matching size, thickness and color
- Insert copper or lead slate tab (soaker) above replacement position
- Slide replacement slate into position
- Secure tab by bending over top edge of replacement slate
- For multiple replacements, work from bottom to top
Methodology for Partial Re-slating:
- Document existing slate pattern and sizes
- Carefully remove slates from affected area, salvaging for reuse
- Inspect and repair battens and underlying structure
- Install appropriate underlay if required (consider breathable options)
- Re-fix salvaged slates following original pattern
- Supplement with matching reclaimed slates as needed
- Maintain traditional detailing at ridges, hips, and valleys
Important Considerations:
Irish regional variations in slate patterns should be respected - diminishing courses (larger slates at eaves, smaller at ridge) are characteristic of western traditions while uniform courses are more common in eastern and urban settings. When Irish slates are unavailable, consider carefully selected imports with similar characteristics. Modern breathable membranes may be appropriate but traditional torching (lime mortar to underside of slates) should be maintained where it exists.
Thatch Conservation
Objectives:
Maintain and repair traditional Irish thatched roofs using appropriate materials and regional techniques.
Irish Thatching Traditions:
- Materials:
- Wheat straw (scollop technique) - eastern counties
- Oat straw - midlands
- Rye straw - limited regions
- Water reed - coastal areas, especially southern
- Regional Styles:
- Northern/Ulster - flush ridges, weighted with ropes and stones
- Western - raised decorative ridge patterns, often whitewashed
- Southern/Wexford - board ridges with exposed decorative scolloping
- Midlands - simpler raised ridge with rounded profile
Key Tools & Materials:
- Appropriate thatching material for region
- Thatching spars (hazel or willow)
- Thatching needle and hooks
- Leggett (for dressing thatch)
- Sharp cutting hook
- Ridge materials (varies by region)
Methodology for Partial Repair (Patching):
- Identify areas requiring repair (typically weather-exposed elevations)
- Carefully remove damaged thatch without disturbing sound material
- Prepare new material matching the existing (straw or reed)
- Apply new material in bundles (yealms) secured with spars
- Dress surface to match existing appearance
- Ensure water shedding at junctions between new and old thatch
Methodology for Complete Re-thatch:
- Document existing thatching pattern and details before removal
- Determine whether to completely strip or thatch over existing layers
- Repair roof structure as needed
- Apply new thatch in traditional manner appropriate to region:
- For straw: apply in layers secured with scollops
- For reed: apply in regular courses fixed to battens
- Create ridge detail appropriate to regional tradition
- Apply traditional finishes (lime wash for ridges if regionally appropriate)
Important Considerations:
Thatching is recognized as a critical traditional skill with few practitioners in Ireland. The Irish Thatched Cottage Insurance Scheme and Historic Structures Fund provide specific supports for thatched buildings. Modern fire retardant treatments are available but should be assessed for compatibility with traditional materials. The life expectancy varies significantly: water reed (25-40 years), wheat straw (15-25 years) with ridges requiring more frequent renewal (7-10 years).
Lead and Copper Roofing
Objectives:
Conserve and repair traditional metal roofing elements while ensuring effective waterproofing and appropriate appearance.
Key Materials & Codes:
- Lead sheet to BS EN 12588:
- Code 4 (1.8mm) - flashings
- Code 5 (2.2mm) - valleys, gutters
- Code 6 (2.65mm) - flat roofing
- Code 7-8 (3.0-3.55mm) - parapet gutters
- Copper sheet (0.6-0.7mm) - roofing, gutters, flashings
- Traditional fixings: copper nails, cleats
- Lead-patination oil
Methodology for Lead Repair/Replacement:
- Carefully remove damaged lead, noting traditional detailing
- Prepare substrate (timber boarding, suitable underlay)
- Cut new lead sheet allowing for thermal movement:
- Maximum bay size 2.5m (length) x 1.5m (width) for Codes 6-8
- Smaller dimensions for steeper pitches
- Form traditional details:
- Wood-cored rolls at 750mm centers
- Drips at 1.5-2.5m intervals
- Welted edges
- Secure with copper or stainless steel clips
- Form proper overlaps at junctions (minimum 100mm)
- Apply patination oil to prevent unsightly white carbonate run-off
Methodology for Copper Work:
- Select appropriate thickness (typically 0.6mm for roofing)
- Prepare continuous substrate (timber boarding or ply)
- Allow for expansion joints at appropriate intervals
- Form traditional details:
- Standing seams at 500-600mm centers
- Cross joints with single or double locks
- Proper edge treatment at eaves and verges
- Secure with copper cleats, never direct fixing
- Allow for natural weathering (green patina develops over 15-20 years)
Important Considerations:
Metal roofing on Irish historic buildings often features specialized details reflecting regional traditions and craftsman's practices. These should be documented and replicated. Lead and copper work should be undertaken by specialists with conservation experience. Avoid contact between dissimilar metals to prevent galvanic corrosion. Consider sustainable sourcing and the environmental impact of new metal sheet. Traditional Irish parapet gutters often featured complex stepped detailing requiring skilled craftsmanship to replicate.
Historic Roof Drainage Systems
Objectives:
Maintain and repair traditional rainwater disposal systems to ensure effective drainage while preserving historic character.
Irish Traditional Systems:
- Parapet Gutters: Common in Georgian urban buildings
- Valley Gutters: Between roof slopes
- Eaves Gutters:
- Cast iron (from late 18th century)
- Half-round and ogee profiles
- Lead-lined timber (earlier buildings)
- Downpipes:
- Cast iron (round and rectangular sections)
- Lead (for high-status buildings)
- Decorative hoppers and fixings
Key Tools & Materials:
- Traditional cast iron components (or close reproductions)
- Lead sheet for parapet gutters
- Traditional jointing compounds
- Linseed oil paint system
Methodology for Cast Iron Repair:
- Document existing system before dismantling
- Carefully remove damaged sections
- Clean components to bare metal:
- Wire brush for light corrosion
- Gentle blast cleaning for heavy corrosion
- Apply traditional primer (red lead or modern equivalent)
- Replace damaged sections with authentic reproductions
- Reassemble with traditional jointing methods (red lead putty)
- Apply traditional paint finish (minimum 3 coats linseed oil paint)
Methodology for Parapet Gutter Repair:
- Carefully remove damaged lead
- Inspect and repair timber substructure
- Ensure adequate falls to outlets (minimum 1:80)
- Line with appropriate lead code (Code 7 or 8)
- Form drips at maximum 2m intervals
- Ensure proper upstands against parapets (minimum 150mm)
- Form proper details at outlets
- Install overflow pipes through parapet as safety measure
Important Considerations:
Historic Irish rainwater systems frequently incorporated decorative elements reflecting architectural style and status - retaining these features is essential to building character. Maintenance access is critical - provide safe means of clearing gutters regularly. When upgrading capacity, consider discreet modifications rather than wholesale replacement. Proper disposal of rainwater at ground level is essential for foundation protection - traditional methods included gullies, drains, and water butts.
Regulatory Context for Roofing Works
Changing roof coverings or drainage systems on Protected Structures requires planning permission. For thatched buildings, specific grant schemes exist:
- The Built Heritage Investment Scheme
- Historic Structures Fund
- The Thatch Repair Grant Scheme
For roof alterations, Building Regulations Technical Guidance Document D (Materials and Workmanship) applies, with potential exemptions for historic buildings where traditional materials and methods are essential to character.
Insulation & Energy Retrofit for Historic Buildings
Improving energy performance in historic buildings requires specialized approaches that respect traditional construction principles while meeting contemporary needs. This guide provides strategies for enhancing thermal efficiency without compromising heritage value or creating moisture-related problems, with particular focus on solutions appropriate to Ireland's damp climate and building traditions.
Understanding Traditional Building Physics
Key Principles:
- Moisture Management: Traditional Irish buildings are designed to manage moisture through absorption and evaporation rather than impermeable barriers
- Thermal Mass: Thick masonry walls moderate temperature fluctuations
- Natural Ventilation: Traditional buildings rely on air exchange through fabric and designed ventilation paths
- Hygroscopic Materials: Traditional materials buffer humidity, absorbing and releasing moisture as conditions change
Common Retrofit Risks:
- Interstitial Condensation: Moisture condensing within building elements due to altered thermal gradients
- Trapped Moisture: Impermeable interventions preventing natural drying
- Thermal Bridging: Cold spots where insulation is discontinuous, leading to condensation risk
- Loss of Character: Interventions that compromise heritage significance
Assessment Methodology:
- Document existing construction and condition
- Identify heritage significance of each building element
- Measure current environmental performance:
- Temperature and humidity monitoring (minimum 12-month cycle)
- Thermal imaging to identify heat loss pathways
- Air permeability testing if appropriate
- U-value estimation of building elements
- Analyze occupancy patterns and heating regimes
- Identify appropriate intervention threshold for each element
Important Considerations:
Standard assessment methods (BER/EPC) often undervalue the performance of traditional buildings. The high thermal mass and hygroscopic properties of traditional Irish structures create a different thermal behavior pattern than modern construction. Interventions should always follow the principle of "least intervention" with preference for reversible solutions that work with, rather than against, traditional building physics.
Solid Wall Insulation Approaches
Objectives:
Improve thermal performance of solid masonry walls while maintaining moisture balance and preserving significant features.
Interior Insulation Options:
| System Type | Suitable Applications | Considerations |
|---|---|---|
| Breathable Woodfiber Boards | Most historic wall types with limited internal features | Good moisture management, moderate thickness (40-80mm), lime plaster finish |
| Calcium Silicate Boards | Damp-prone walls, limited space | Excellent moisture handling, thinner solution (20-40mm), limited thermal benefit |
| Cork Lime Plaster | Walls with moldings/features to preserve | Minimal thickness (15-30mm), can follow contours, limited thermal improvement |
| Hemp-Lime Composite | Irregular stone walls, timber-framed structures | Excellent moisture compatibility, can be cast around irregular surfaces |
Methodology for Internal Wall Insulation:
- Assess wall condition and treat any existing moisture issues
- Remove existing finishes if necessary, documenting any significant features
- Install appropriate system:
- For woodfiber boards:
- Apply lime plaster base coat to even surface
- Adhere boards with compatible adhesive
- Secure with mechanical fixings if required
- Apply mesh reinforced lime plaster finish
- For cork-lime systems:
- Apply direct to prepared wall surface
- Build up in layers to required thickness
- Finish with fine lime plaster
- For woodfiber boards:
- Address key junctions and thermal bridges:
- Window and door returns
- Floor junctions
- Internal walls meeting external walls
- Service penetrations
- Ensure adequate ventilation strategy following installation
External Insulation Considerations:
External insulation is rarely appropriate for historic buildings with significant façades but may be considered for:
- Rear or secondary elevations of lesser significance
- Buildings with render that requires replacement
- Structures with limited architectural detailing
When appropriate, breathable systems using woodfiber or cork with lime render finishes should be specified, with careful detailing around openings, eaves, and projecting features.
Important Considerations:
Internal insulation inevitably involves some loss of floor area and may affect historic features. Hygrothermal modeling may be necessary for high-risk scenarios. Preventing lateral moisture movement at junctions is critical. Monitor performance post-installation to ensure moisture balance is maintained.
Roof & Floor Insulation
Objectives:
Improve thermal performance of roof and floor elements while maintaining building physics and preserving historic fabric.
Roof Insulation Options:
- Attic Floor Insulation:
- Simplest intervention for pitched roofs with accessible attics
- Materials: sheep's wool, hemp, woodfiber, cellulose
- Thickness: 200-300mm between and over joists
- Ensure adequate eaves ventilation is maintained
- Consider raised walkways to maintain access
- Rafter-Level Insulation:
- For inhabited attic spaces or exposed ceilings
- Breathable systems: woodfiber boards, hemp-lime, sheep's wool
- Maintain ventilation path above insulation
- Consider impact on roof height and eaves details
- Flat Roof Insulation:
- Challenging to implement without risking moisture issues
- 'Warm roof' approach generally preferable
- Requires careful assessment of existing structure
Floor Insulation Options:
- Suspended Timber Floors:
- Access from below: flexible batts between joists
- Access from above: carefully lift boards and install between joists
- Materials: sheep's wool, woodfiber, hemp
- Ensure adequate subfloor ventilation is maintained
- Consider reflective membranes for limited space
- Solid Floors:
- Intervention usually requires lifting existing floor
- Consider significance of existing floor before intervention
- Limecrete systems with insulation for breathability
- Edge insulation to reduce thermal bridging
Methodology for Suspended Floor Insulation:
- Assess floor condition and treat any decay
- Ensure adequate subfloor ventilation
- Document floorboard layout if lifting is required
- Carefully remove boards if necessary (starting with previously disturbed areas)
- Clean joist spaces and check structural integrity
- Install appropriate insulation between joists:
- Flexible batts cut to fit with friction fit
- Support with mesh if access is from below
- Ensure no gaps at joist edges
- Install vapor-permeable membrane if appropriate
- Reinstate floorboards in original positions
- Seal gaps between boards if appropriate (consider reversible methods)
Important Considerations:
Always maintain ventilation pathways in roof spaces and below suspended floors. Insulating between ceiling joists is generally lower risk than rafter insulation. Historic floorboards and decorative ceilings represent significant heritage value - interventions should minimize impact. Consider 'thermal zones' approach rather than uniform treatment throughout building.
Windows & Doors Energy Improvements
Objectives:
Enhance thermal performance of historic windows and doors while preserving their character and architectural significance.
Window Improvement Hierarchy (Least to Most Intervention):
- Maintenance & Draught-proofing:
- Repair sashes, frames, and glazing
- Install discrete compression or brush seals
- Address gaps between sash and frame
- Reduce infiltration around frame/wall junction
- Can achieve 30-60% reduction in air leakage
- Internal Shutters:
- Restore original shutters where present
- Install new shutters based on historical evidence
- Add discreet insulation to shutters
- Ensure good seal when closed
- Can reduce heat loss by 40-60% when closed
- Secondary Glazing:
- Independent internal glazing system
- Minimal impact on external appearance
- Various opening options to match primary window
- Can include low-E glass for enhanced performance
- Achieves significant thermal and acoustic benefits
- Replacement/Modification:
- Consider only for windows of limited significance
- Slim-profile double glazing in existing sashes
- Vacuum glazing options for minimal thickness
- Careful replication if replacement unavoidable
Door Improvement Approaches:
- Draught-proofing:
- Brush or compression seals at perimeter
- Letter-box brushes and covers
- Keyhole covers
- Threshold seals
- Thermal Improvements:
- Internal insulating panels for solid doors (removable)
- Secondary lobby/porch where appropriate
- Curtains for internal doors between thermal zones
Methodology for Secondary Glazing:
- Measure opening accurately, allowing for irregularities
- Select appropriate system:
- Sliding for sash windows
- Hinged or fixed for casements
- Consider access for cleaning and ventilation
- Specify discrete framing (aluminum or timber)
- Position to minimize visual impact, ideally aligning with glazing bars
- Ensure adequate trickle ventilation
- Install with minimal fixings to historic fabric
- Use clear glazing to minimize visual impact
Important Considerations:
Historic windows are often among the most significant features of historic buildings. Single glazing with shutters and curtains can perform better than assumed. Improving windows should be part of a whole-building approach. Consent requirements are stringent for window alterations to Protected Structures. Ventilation strategy should be reviewed when improving air-tightness.
Regulatory Context for Energy Improvements
Energy efficiency improvements to Protected Structures must be carefully balanced with conservation requirements:
- Building Regulations Part L (Conservation of Fuel and Energy) contains exemptions for Protected Structures and buildings of architectural or historical interest
- Building Energy Rating (BER) certificates are not mandatory when selling or renting Protected Structures
- SEAI grant schemes have specific pathways for traditional buildings
- The Climate Action Plan 2023 acknowledges the special considerations for historic buildings
Conservation professionals should consult the SEAI/DCHG joint publication "Energy Efficiency in Traditional Buildings" and the DEAP methodology for historic buildings.
Moisture Management
Moisture management is perhaps the single most important factor in preserving Ireland's built heritage. This guide addresses the identification, diagnosis, and remediation of moisture-related issues in historic buildings, emphasizing approaches that work with traditional building physics rather than imposing incompatible modern solutions.
Understanding Moisture in Traditional Buildings
Key Principles:
- Breathability: Traditional buildings manage moisture through absorption and evaporation
- Balanced Moisture Movement: Continuous cycle of wetting and drying
- Material Compatibility: Traditional materials work as integrated system
- Ventilation: Air movement essential for moisture management
Moisture Sources in Irish Buildings:
- Rainwater Penetration:
- Direct driving rain (particularly western exposures)
- Defective rainwater goods
- Splashback from hard surfaces
- Roof and chimney defects
- Ground Moisture:
- Rising damp through porous materials
- Lateral penetration through retaining walls
- Inadequate drainage around foundations
- High local water tables common in Ireland
- Condensation:
- Surface condensation on cold elements
- Interstitial condensation within structures
- Cold bridging at junctions
- Inadequate ventilation of moisture-generating activities
- Building Use:
- Occupant activities (cooking, washing, drying)
- Intermittent heating regimes
- Inappropriate internal environments
Common Moisture-Related Issues in Irish Buildings:
- Fungal decay of timber (wet rot in damp conditions, dry rot where ventilation lacking)
- Stone and brick deterioration due to salt crystallization
- Mortar erosion from persistent saturation
- Plaster failure through salt contamination
- Limewash breakdown and algal growth
- Mold growth on interior surfaces
Important Considerations:
Many moisture problems in Irish historic buildings result from inappropriate modern interventions rather than inherent design flaws. Traditional buildings are designed to get wet and dry out, not remain permanently dry. Ireland's maritime climate with high rainfall and humidity presents particular challenges for moisture management. Correctly diagnosing moisture sources is essential before intervention.
Moisture Assessment & Diagnosis
Objectives:
Accurately identify sources and pathways of moisture in traditional buildings to inform appropriate remediation strategies.
Key Tools & Equipment:
- Moisture meters:
- Resistive type (pin) for timber
- Capacitance type (non-destructive) for masonry
- Hygrometer for relative humidity measurement
- Data loggers for long-term monitoring
- Thermal imaging camera
- Salt analysis test kits
- Borescope for cavity inspection
- pH testing papers
Assessment Methodology:
- Visual Inspection:
- Document visible moisture damage patterns
- Note staining, efflorescence, mold, decay
- Examine external envelope for defects
- Check rainwater disposal system
- Moisture Mapping:
- Create grid pattern measurements on affected walls
- Record moisture readings at consistent height intervals
- Map results to identify patterns
- Compare external/internal wall faces
- Environmental Monitoring:
- Record temperature and RH in affected areas
- Calculate dew point temperatures
- Monitor over seasonal cycles if possible
- Compare occupied/unoccupied periods
- Specialized Testing:
- Salt analysis to identify contamination
- Thermal imaging to locate cold bridges
- Borescope investigation of cavities
Diagnostic Patterns:
Rising Damp:
- Horizontal "tide mark" typically up to 1.5m
- Higher moisture content at base decreasing with height
- Often associated with salt efflorescence
- Present on internal and external wall faces
Rainwater Penetration:
- Localized to specific areas
- Often associated with architectural features
- Weather-dependent symptoms
- Higher readings on external than internal faces
Condensation:
- Often seasonal (worse in winter)
- Mold growth in geometric patterns
- Concentrated in corners and north-facing walls
- Associated with thermal bridges and poor ventilation
Important Considerations:
Many moisture issues involve multiple sources and mechanisms. Single readings can be misleading - systematic mapping and monitoring over time provide more reliable diagnosis. In Irish buildings, driving rain penetration is frequently misdiagnosed as rising damp. Allow for seasonal variations in assessment, as Ireland's climate can significantly affect moisture patterns throughout the year.
Dealing with Ground Moisture
Objectives:
Manage ground moisture in historic buildings using methods compatible with traditional construction and building physics.
External Approaches (Least Invasive):
- Site Drainage Improvements:
- Lower external ground levels to below internal floor
- Create minimum 150mm reveal of plinth course
- Ensure 2% fall away from building
- Replace impermeable paving with porous materials
- Install French drains where appropriate
- Rainwater Management:
- Repair/upgrade guttering and downpipes
- Ensure proper discharge away from foundations
- Consider traditional drainage outlets (gullies, water butts)
- Breathable External Finishes:
- Replace cement renders with lime-based alternatives
- Remove waterproof coatings from plinth areas
- Consider limewash for appropriate buildings
Internal Management Approaches:
- Ventilated Solid Floors:
- Limecrete floors with insulation and vapor control
- Maintain/create air bricks for subfloor ventilation
- Ensure adequate ventilation paths under suspended timber
- Breathable Wall Treatments:
- Remove cement renders and gypsum plasters
- Replace with appropriate lime plasters
- Consider sacrificial plasters for salt-contaminated walls
- Use permeable paint systems
- Ventilation Improvements:
- Ensure adequate background ventilation
- Consider passive stack or mechanical ventilation with heat recovery
- Monitor and manage indoor humidity levels
Approaches to Avoid:
- Chemical DPCs (ineffective in thick, irregular walls)
- Tanking systems (trap moisture within walls)
- Cement-rich renders and screeds
- Impermeable floor membranes without ventilation
Methodology for Lime Plaster Renewal:
- Remove existing failed plaster to 300-500mm above visible damage
- Allow wall to dry thoroughly
- Prepare masonry surface, removing loose material
- Apply coarse lime plaster (1:3 NHL 3.5:sand) as base coat
- For salt-contaminated walls, consider 30mm sacrificial plaster
- Apply finish coat with NHL 2.0 or lime putty mix
- Use compatible paint finishes (limewash, mineral or silicate paints)
Important Considerations:
Traditional Irish buildings were designed to manage moisture rather than eliminate it entirely. Focus on establishing a balanced moisture equilibrium rather than complete drying. Many ground moisture issues are exacerbated by inappropriate modern interventions. For severely affected buildings, consider implementing a staged approach with monitoring between interventions to assess effectiveness.
Ventilation Strategies for Historic Buildings
Objectives:
Develop appropriate ventilation strategies for historic buildings that manage moisture effectively while maintaining comfort and energy efficiency.
Understanding Traditional Ventilation:
- Historic Irish buildings relied on:
- Air permeability of building fabric
- Designed ventilation paths (chimneys, vents)
- Window operation (sash windows provide excellent controllable ventilation)
- Stack effect in taller structures
- Modern interventions often disrupt these pathways:
- Blocking chimneys
- Sealing windows
- Applying impermeable finishes
- Creating internal partitions
Ventilation Principles for Historic Buildings:
- Whole-Building Approach: Consider air movement through entire structure
- Background Ventilation: Continuous low-level air exchange
- Purge Ventilation: Ability to rapidly ventilate when needed
- Targeted Extraction: Remove moisture at source (kitchens, bathrooms)
- Balanced Strategy: Match ventilation to building use patterns
Ventilation Solutions (Least to Most Intervention):
- Restore Original Features:
- Reopen blocked chimneys or install vents in fireplace
- Restore/repair original air bricks and vents
- Maintain operability of traditional windows
- Clear ventilation pathways in roof spaces
- Discreet Passive Solutions:
- Humidity-controlled trickle vents in windows
- Passive stack ventilation using existing chimneys
- Passive through-wall ventilators in discrete locations
- Wind-driven roof ventilators (where visually acceptable)
- Mechanical Systems:
- Intermittent extract fans in moisture-generating rooms
- Continuous low-level mechanical extract
- Decentralized mechanical ventilation with heat recovery
- Whole-house mechanical ventilation (for extensively retrofitted buildings)
Methodology for Implementing Ventilation Strategy:
- Assess current ventilation pathways and air movement
- Identify areas of moisture generation and stagnation
- Measure relative humidity in problem areas
- Implement least invasive solutions first:
- Clear blockages in existing ventilation paths
- Ensure operable windows function properly
- Add discrete trickle ventilation if necessary
- For persistent issues, consider:
- Extract fans ducted through existing openings
- Passive stack systems using redundant chimneys
- Humidity-controlled mechanical ventilation
- Monitor results and adjust strategy as needed
Important Considerations:
Ventilation strategy should balance moisture control, comfort, and energy efficiency. In the Irish climate, dehumidification may be necessary alongside ventilation in some cases. User behavior is critical - provide clear guidance for building occupants. Sophisticated systems require appropriate maintenance regimes. Ventilation design should consider seasonal variations in temperature and humidity typical in Ireland.
Regulatory Context for Moisture Management
While addressing moisture issues is generally considered repair and maintenance, significant interventions may require consent:
- Building Regulations Part C (Site Preparation and Resistance to Moisture) acknowledges traditional construction requires different approaches
- Part F (Ventilation) provides for alternative approaches for historic buildings
- Part L (Conservation of Fuel and Energy) exemptions allow moisture-safe approaches
The Building Limes Forum Ireland provides guidance specific to the Irish context, while the SPAB Research Reports offer evidence-based approaches to moisture management in traditional buildings.
Case Study: St. Mary's Cathedral, Limerick - Stone Conservation Project
Project Overview
St. Mary's Cathedral in Limerick, dating from the 12th century, presented significant conservation challenges due to the differential decay of limestone elements, particularly in the western façade. This case study documents the assessment, planning, and implementation of conservation treatments for severely deteriorated masonry while addressing the complex issues of historical significance, phasing of work, and balanced intervention.
Key Challenges
- Severe stone decay in sculptural elements of international significance
- Differential weathering between original medieval masonry and 19th-century restorations
- Failed cement-based repairs from the 1960s causing accelerated deterioration
- Ongoing water ingress through deteriorated mortar joints
- Complex heritage protection requirements under multiple designations
- Need to maintain cathedral functions during works
Assessment and Diagnostic Phase
The project began with comprehensive documentation including:
- Laser scanning and photogrammetry to record existing conditions
- Stone-by-stone condition mapping of the west façade
- Petrographic analysis of both medieval and 19th-century stone
- Mortar analysis of original and later pointing
- Environmental monitoring to understand exposure patterns
- Archival research to identify previous interventions
- Archaeological recording of medieval masonry techniques
Conservation Approach
A tiered intervention strategy was developed based on stone condition and significance:
- Tier 1 (Minimal Intervention): For sound historic masonry, limited to gentle cleaning and selective repointing
- Tier 2 (Consolidation): For moderately decayed elements, including consolidation and shelter coating
- Tier 3 (Targeted Repair): For localized severe decay, including lime-based mortar repairs and selective stone indents
- Tier 4 (Replacement): Limited to structurally compromised elements with minimal remaining original material
Materials and Methods
- Stone Selection: Replacement stone sourced from historically verified quarry near Limerick, petrographically matched to original
- Mortar Formulation: Custom NHL 3.5-based mortar with carefully matched aggregates for pointing and repairs
- Consolidation: Ethyl silicate consolidant applied to friable surfaces following trials
- Cleaning: Nebulous water spray and specialist conservation poultices for specific contaminants
- Surface Protection: Shelter coating of lime wash with casein for highly exposed elements
Implementation
The work was phased over three years to allow for appropriate curing periods and seasonal working restrictions. Key aspects included:
- Removal of damaging cement-based repairs from the 1960s
- Repointing with historically appropriate lime mortar
- Targeted stone replacement (less than 5% of total façade)
- Installation of discrete lead flashings to protect horizontal surfaces
- Monitoring program established for long-term condition assessment
- Training program for maintenance staff
Outcomes and Lessons
The project demonstrates the effectiveness of a carefully planned, conservation-led approach to significant historic masonry. Key lessons include:
- The importance of thorough assessment before intervention
- Benefits of a graduated intervention strategy based on significance and condition
- Value of traditional materials and techniques in ensuring compatibility
- Critical importance of ongoing maintenance following major conservation
- Need for multidisciplinary collaboration between conservators, architects, archaeologists, and stone masons
The project received an Irish Georgian Society Conservation Award and serves as a reference model for ecclesiastical stone conservation in Ireland.
Need Specialized Guidance?
Contact our team for personalized advice on your historic building conservation project.
Contact Us Explore Our Programmes